Archive for May, 2011

From size 3 to size 120
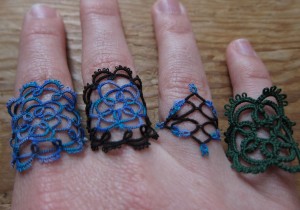
During the Shuttlebirds’ conference last month I broke down and picked up a couple spools of King Tut quilting thread from Debbie Arnold of DS9 Designs.  I say that I broke down because I was really resisting buying more thread during the conference (though I managed to spend all my money on shuttles instead) and with my tendency to want to work on really large projects I really don’t need to start thinking about quilting thread (Debbie says it’s the equivalent to size 120.), but the colors are just so pretty that I couldn’t resist a couple just to try it out.

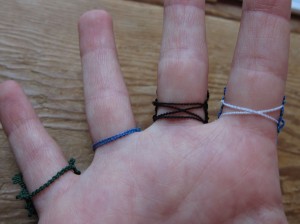
I made the motif of the one on the left first just to try out using thread this small and see how the variegate would work out.  The pattern is the same motif from the star doily (at some point I’m going to actually finish that).  I finished the motif and had it sitting on my hand and realized it would make an awesome ring.  I worked up the green one on the right to mess around with trying out a band.  (It’s the center part of the motif in size 20 thread.)

Note: I wouldn’t do it again in size 20 thread because (as you can see) it doesn’t lay flat nicely (though this might be because of the very scalloped edging), but I just wanted something that would work up quickly so I could try it out.  I’ll have to try sizes 40 and 80 sometime to see how they work.  I think 80 would be good for most patterns.  40 might depend on the edges.

The bands are just lock-chains from one side to the other.  (Note that the picture is flipped from the one above.)  The first two I made just a single band and then played around with criss-crossing them.  I like the black one on my middle finger the best.  Each time it’s attached to the motif it’s done with a join so I think that it one band were to break the others would stay put ok.  It’d have to be fixed, but at least the ring wouldn’t be lost.  That being said, the chains are pretty strong so I think they will be ok.

If I don’t get distracted I’ll probably make a bunch more of these.  In all of these samples I made the motifs separate from bands, largely because I wanted the bands to start a places where it wasn’t convenient to end tatting the motif.  I think it’s a good way to do it for now.  At least until I’ve done a bit of product testing and seen how strong the chains are in this size thread.  If a band breaks, I can just make another.

One thing I haven’t figured out yet is how to hide the ends with this size thread.  I’ve recently gotten into the habit of sewing in my ends rather than using the magic thread technique and I tried doing that with the first motif, but it was really difficult to make it work and it turned in to a (literal) bloody mess.  It’s hard to get the needle in between the stitches and managed to instead to split the thread and fray it in the process.

For the last two rings I just tied off the thread and cut it so hopefully they don’t come apart.  I’ll try the magic thread trick next, but looking for other suggestions.  I think I was using a size 26 (might have been 22) tapestry needle.  Are sewing needles smaller?  I feel like with a smaller needle I just might be likely to fray the thread more.

Edit:  One thing I’ve noticed after wearing it for a couple days is that it does stretch some.  The lock chain is pretty stretchy (that’s why I picked it) but I wonder if a spiral chain might have been better.   Just be aware that if you make one you need to make it really tight.  The next one I make I might try making it for smaller finger and wearing it on that one for a while before switching it to the finger I actually want it for.

 

Comments (4)

The New Belt is Finished (Sort of)

I’ve actually got this belt finish, (mostly, I’ll clarify at the bottom of this post) but don’t have good pictures and have it packed at the moment.  I took the train back from San Diego to Seattle this week and haven’t gotten myself organized again yet.  I did take pictures earlier on in the project so I’m going to post those and go through the pattern.  I’ll post the finished pictures when I get unpacked, but here’s what it looked like when I had finished one strip of it.

The whole thing was just under 18 inches.  When I made my first belt I made the tatting portion of it 27 inches long so that it would be the largest part of the belt, but I ended up liking the way the ribbon looked (especially once I added a little bit of tatting to it to cover up how I attached it to the main part of the belt) and decided that for the next one I’d make the main tatting portion of it smaller.  So sadly, the difference in the the sizes of the two is an astethics thing and not that I lost 9 inches around my waist.  :(  If I want to lose 9 inches off my waist I probably shouldn’t spend my time sitting on the couch tatting.  (Actually, I do tat while hiking, but I haven’t done that lately.)

Anyway, here’s the original pattern:

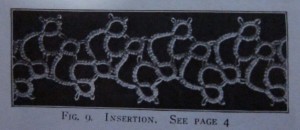
Nice and simple, right?  Well, if you have the picture in front of you.  It’s actually a little trickier than written because the joins aren’t intuitive.  I love how they just say “joining as in the cut”.  Though, admittedly, it’d be a pain in the butt to explain write it all out and it probably wouldn’t make sense.  You really do need to have the picture in front of you for the first couple repeats.  Here’s “the cut”:

Instead of the 6-6 chains I did 5-5.  Just seemed to work better for me, but that’s probably a function of how I tat.  I think my chains tend to be looser than my rings so if you’re going to try the pattern, see what works for you.  Other than that I didn’t change anything, but I did add a shoelace trick after the first ring for every repeat after the first to keep the chains from twisting.  (If you’re doing it all in one color you could just use two shuttles and switch which is the ring shuttle and which is the chain shuttle with each repeat)  There’s also some annoying stuff going on with the joins if you pay attention to frontside/backside tatting.  I don’t normally, and didn’t worry about it on this as far as doing my rings vs. chains, but  in this pattern you’re joining chains to rings so you do need to pay attention to it for the joins.  I’ll explain that after the pattern.

Here’s my modernized shorthand version of the instructions.  I’ll label the rings R1 and R2 and the chains Ch1 and Ch2 so that hopefully my explanation of where to do the joins will make more sense.

(R1) 5-5-5-5  (NEVER joined to anything when first tatted.  (This was hard for me to remember.  Lots of retro-tatting because of this.))

*(Ch1) 5-5 (after the first round, this is always joined at the picot to the last picot of R2 from the previous repeat.)

(R2) 5+(always joined to the last picot of the first ring) 5-5-5

(Ch2) 8-8 (always joined at the picot to the middle (2nd) picot of R2 from the PREVIOUS repeat.)

(R1) 5-5-5-5.  (Note that this ring is NOT joined to anything.)

Shoelace trick to switch the threads before the next chain.

Repeat from * joining as described.

Does all that make sense?  Let me know if this is clear.  (Part of the whole point of doing this blog is for practice in writing up patterns, so please, always feel free to let me know what’s helpful and what’s confusing).  Would it make more sense if the the “guidelines” for joining were written after the pattern when you’re working on the second repeat?

Finally, a note about the joins.  If you’re using two colors you have to pay attention to your joins because you’re doing joins of chains to rings.  When you do a join with threads of different colors you get a little blip of color with your joins.  Usually I don’t worry about that and just call the side where that happens the “back” side.  Problem is that with this pattern you do a shoelace trick to reverse the work with each repeat.  This means that the blips of color are not all on the same side of the tatting anymore.  They switch sides with each repeat.  Arg.

If you want to avoid the color you’ve got to switch your type of join with each repeat.  I usually do an up join, but for every other repeat I needed to do a down join for the chains to rings joins.  Pain. In. The. Butt. Very hard to remember and I did it wrong a few times so I’ve still got the blips of color on both sides.  I might not have worried much except that since I was using size 3 thread on this the colors are petty noticeable.  (To me anyway).  At Camp Wannatat, Sandy showed me the Larks Head join which is more work, but gets rid of the blip.  This would have been a good project to practice this on, but unfortunately, I totally forgot about it until after I finished the tatting.  Another time, perhaps.

When I started messing around with this pattern I picked it because I wanted a relatively thick edging that could be done in one pass.  I wasn’t sure if I would like the final version because I didn’t know if it worked in just one color.  Seemed too chaotic.  I think it’s much better in two colors and I like it this way, but decided I’d do the doubled over version anyway to make a really wide belt.  I’m just a sucker for symmetry, and even though the final version doesn’t have left-right symmetry, it does have top-bottom symmetry and that makes me feel better…

So I tatted up a second row and added it to the first as I went.  The whole frontside/backside tatting with regards to the joins was an even bigger pain in the butt to keep track of for the second row, so there’s a bunch of mistakes there too. I decided at the last minute to wear it to a wedding. (Picture on the right.  Don’t you love the matching necklace!  That’s the center part of the motif from the star doily in Priscilla Book #3 in the same size 3 blue thread as the rings on the belt.  The color is a little funky in the picture, but the dress is actually a dark blue, not black.)  I ended up sewing on the ribbons at my friend’s hotel room when I went to pick her up to head over to the church.  This means that I haven’t yet gotten around to tatting up something to cover the sewing.  I do have an idea for that though, so maybe sometime this week.  When I’m done with the “finishing” work I’ll take more pictures of the whole thing.

I’ve really enjoyed making belts.  They work up pretty quickly in size 3 thread and it’ll be fun to have a bunch of them to easily add some lace to dresses.  Plus, they’ll be a great way to try out a lot of the edgings in the Priscilla books.  Since I think I’m going to make more I’ve even gone and given them their own category to the right.  This way all the belts will be easily browse-able.

Comments (2)

The Shawl – Half(?) Done

I started this shawl approximately 2 years ago and I think now I’m about half done.  It’s been two years since I started, but I have a tendency to just do a shuttle-full worth of work on it at a time before I put it away for a month or so and then do a bit more work on it.  I’m estimating that there’s probably only about 50 hours of actual work in it so far.

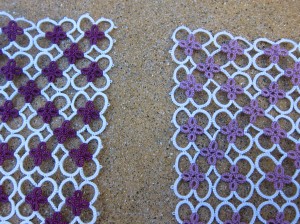
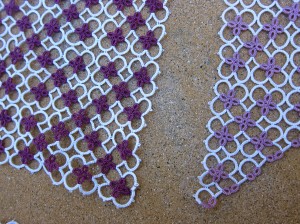
The plan is for it to be triangle shaped.  These three pieces and then a white border around it.  I’ve just started the second light purple and white triangle and this one will match the first one on the other side.  Originally I had planned to have these three pieces right up next to each other, but when I tried to do that I found that the edgings where they joined the colors were just too busy.

I stared at it for a while and decided finally that I just needed some sort of buffer in white between the two pieces.  So now the plan is to have a white insertion between the two pieces to keep the colors separate.  With the matching white border around the entire piece I’m hoping this will come out looking really nice. The pattern always reminds me of stain glass and I think having these sections of white will increase that effect.

I’m a little concerned about how I’m going to make the parts where the edging meets up with the insertion and concerned about how I’m going to make the edging turn the corners around the triangles, but I’ve decided to wait and just figure that out when I get to it.  I figure I’m actually over half done with the tatting of the finished piece now, but once you take into account all the retro-tatting and experimenting I’m going to end up doing to turn those corners I think I’m less than half done with the project.

Doing the three main sections separately and joining them with an insertion has the added advantage of meaning that I can work on them separately and don’t need to carry around the whole thing while I’m working on it (or at least not until the end.)  As much as I love the idea of really big pieces being done all in one go (no ends to cut and tie except when adding new thread) it is nice to be able to just focus on one smaller piece (where smaller is still about 20 hours worth of tatting…)


Comments (4)

Picking a Pattern for a New Belt Project

Michael’s had ribbon on sale last week and I couldn’t resist picking up a few new colors to try out with some new tatted belts.  There’s a particular pattern in Priscilla Book #2 that’s been bothering me lately.  I can’t decide if I like it or not, but I think it might make a nice belt.  And if it turns out I still don’t like it?  Well, at least I’ll be tatting it in size 3 thread so it should go quickly.

For the last belt I made I used a ring and chain pattern that had to be doubled over to give it vertical symmetry and make it the right width for the belt. This meant tatting one side of the belt and then flipping it over and tatting the other side. It’s been my normal way of turning edgings into bracelets or necklaces or anything I want to be thicker, but I’ve been wanting to find a pattern I like that can be done in one pass and still result in a fairly wide piece of fabric.  Haven’t found one I really like yet.

This pattern has been catching my eye because it’s done in one pass and it looks like it ends up being fairly wide.  I’m just not sure I like it.  It’s hard to follow and feels a bit chaotic.  I tatted up a small piece of it just to get a feel for the pattern and still wasn’t totally sure about it.  (Wish I could have tatted a longer piece, but I ran out of shuttle thread.  Size 3 goes pretty quickly.)  I think tatting it in two different colors will help to give it a little more definition.  The rings in the pattern come in pairs and the chains should form something of a wave of color bending around the pairs of rings.  I’m going to try it out in two colors, and I’ll write up the pattern for it when I do.

Though my main attraction to this pattern is that it’s done with only one pass, it’s not totally symmetric and I’m starting to wonder what it would look like doubled over.  Though a single pass should be wide enough for a belt doubled over might looking interesting as a super-wide belt (or normal sized with size 10 thread).  I may end up trying that as well.  I will say that I really like using the size 3 thread for belts because I think then they’re actually big enough that you can see the design from farther away.  Belts are not really meant to be looked at up close.  At least, I’d rather not have people bend down and take a look at my waist from 6 inches away, but hey, maybe that’s YOUR thing…

Comments (2)

Found Some Tatting!

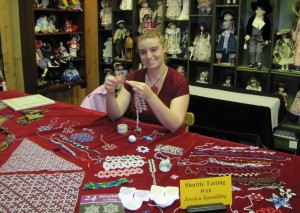
As will come to no one’s surprise, I managed to find a few pieces of tatting to display at the Piecemaker’s Peddler’s Market where I demoed tatting and got people interested in my classes on Sunday.  As you can see, I sat in the doll room, sharing the table with Judy who does lovely needle weaving.  It was a fun day and was nice to have an excuse to do nothing but sit around and tat for a few hours.  I haven’t had much time for tatting lately and had a wedding garter to finish.  That’s what I’m working on in the picture.  I’ll do a post on that sometime soon too.  I met up with my friend, yesterday for the final fitting before adding the elastic.  Finished it up last night and it looks pretty awesome with the ribbon.  I’ll do a post on that at some point after the wedding when I can use the pictures the professional photographer will take.

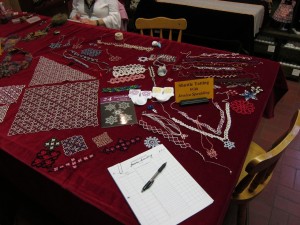
Here’s another picture of the full table.  Only one person signed up at that point to get more information about the class, but I had six by the end of the day and they’ve had other people come into the store expressing interest.

To the left in the pictures is the shawl I’ve been working on for two years.  Actually that’s not quite true.  I did start it about two years ago, but I have a habit of doing a shuttle-full of work on it and then putting it aside for a few months before taking it back out and doing another shuttle-full on it.  I think it’s now about half done so I should probably do a little post updating the progress on it.

(To zoom in on the picture, click on it once and you’ll be taken to a blog page with the picture.  Click on it again and you’ll be taken to ANOTHER page with just the picture.  A third click should then zoom in on the picture.  Really annoying but I haven’t figure out how to change it so you don’t have to click so much to zoom.)

The two necklaces in front of the sign with my name are from a pattern from one of the Priscilla books that I haven’t written up here yet.  I actually made them a few months ago, but they got put aside and I’d forgotten about them until I found again while looking for tatting for the display.  I really like that pattern and now that I’ve found the necklaces again I should get around to posting about it sometime soon.

Now that the garter is done I’ve started work on another belt.  I’ll post on it later once I’ve had a chance to take some pictures in daylight.  (If you’re keeping score, that’s now 4 posts I owe you.)  I’ve been trying to not start any more new big projects until I’ve finished up others.  That being said, this new belt pattern seems to work up so quickly I don’t know if it should count as a “big” project.  That means I can pick out something else “big” to start now to replace the garter, right?  Yes.  I know I have a problem.  No.  I’m probably not going to do anything about it.

Leave a Comment

Scrounging for some tatting…

Tomorrow I’ll be spending the day demoing tatting at the Piecemaker’s Peddler’s Market in Costa Mesa.  I’m going to start teaching there in August and they use their Peddler’s Market also as a way to advertise all the different classes they have going on there.  They used to have a needle tatter teach there, but she lives a very long way away so was looking for someone to take over as the tatting teacher there.  We met back in March and she put me in touch with them so I’m now the official tatting teacher there.  (Assuming they like my classes this quarter and let me stick around!)

I’m looking forward to meeting some of the their teachers tomorrow and seeing what classes I might end up taking.  I generally to stick with tatting, because everytime I think about learning something new (at some point I’d like to learn knitting and weaving) I remember all the tatting projects I want to do.  I also remember how little space and time I have for anything new and that usually keeps me from starting new crafts.  Heh.  I have no space or time for anything new.  All 4 dimensions are filled.

That being said, Piecemakers has a lot of interesting classes.  Sure, they’ve got the usual knitting, quilting and crocheting but after those three tatting is actually one of the more well-known techniques that they have classes for.  They also seem to have a very strong marketing department and a strong following in the community so I’m hoping my classes fill up and I’m really looking forward to teaching there.  I’m going to teach two different beginning tatting classes (different, so that you can take both of them and still get a lot of new stuff from the second one) in August and then an intermediate class in September.  Class proposals are due early next week so I need to finally settle on what I’m going to teach for each.

The title for this post comes from the fact that most of my “good” pieces of tatting are kept in a train case that I left in my car up in Seattle.  (Last week I few back from Seattle to San Diego and in another week and a half I’m going to take the train up to Seattle, pick up my car again and then I have about 4 weeks to spend time there and Vancouver Island and then make my way back to LA.)  I forgot about tomorrow’s demo when I was quickly packing up stuff for this trip back south.  Mostly I took stuff that I wasn’t going to need for the rest of my time traveling the Northwest.  Wanted to bring it back to make a little more space in my car.  SO all my fingerless gloves, bookmarks and hair pieces are sitting in my car in Seattle and I won’t be able to have them out for tomorrow’s demo.  Luckily I did bring down all the pieces I have finished for my shawl so far (I really need to do an update on that project.  I think it’s about half done now).

After my first initial panic when I realized I hadn’t brought much down I remembered that I’ve been tatting for 10 years now so there’s tons of stuff here at my parent’s house, including a small coffee tablecloth.  Only a single fingerless glove though, from a pair that I haven’t finished making, so I’ll have to stick with pictures for those.  Other than the gloves and flower barrettes, the only thing I’m disappointed I don’t have is all my books, though I don’t have a very large library.  Everything fits in a single over-the-shoulder bag which I took up to Seattle with me.  I would have liked to have had books out for people to flip through.  I do have a snowflake book which I think will be popular and of course, I have the Priscilla books so between the two that should be enough to give people a start of an idea about what sorts of things they can make.

Anyway, I should go dig around in the back of drawers and see what sort of tatting I can find.  I’ll take pictures tomorrow of what I manage to come up with.  It’s going to be a pretty random collection of old projects that I haven’t looked at in years so it might end up inspiring some new ones.

Comments (3)

Secret tatting!

Well, not really secret, but I’ve been working on stuff that will be gifts for other people so I can’t share pictures.

One is a garter belt for a friend who’s getting married about 9 days from now.  I’m just about done with the tatting for it now and we’re going to do a final sizing to make it work early next week.  I’m using Gina Butler’s pattern available on her website here: http://www.ginabea.com/tatting.php  Very pretty with nice little dimpled rings.  Actually, it’s a slight variation on it.  I’m adding blue beads to take care of her blue and I’m not doing the lock chains in the back because I’m only going to do a small piece of elastic in the back.

I also recommend checking out her pattern “Heart Strings”, Single Shuttle Split Ring Hearts.  Very cute.  I think I want to teach that pattern at Shuttlebirds next year.

I have a few other gifts I’m working on and should finish up over the weekend.  I’ve been flipping through the Priscilla books trying to pick out a pattern.  I just bought some more size 3 thread and matching ribbon.  I’m planning on making another belt so I’ve been focused on the edging patterns, but my eye keeps being drawn to the butterfly patterns in book #2.  We’ll see what I get around to first.

Leave a Comment