Sash Belt is Finished!

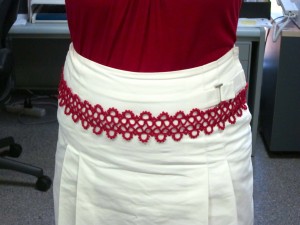
 It’s so nice to finish large project and it’s amazing how having a deadline will actually force you to do it. I wanted to wear my new belt for Valentine’s day so I finally sat down over the weekend and finished it off. Doesn’t it look lovely in my co-worker’s office? (Had to take it there because she actually has a window and real sunlight.) Finishing off the belt didn’t actually take too long because I’ve had the main part of the belt tatted for over a month now. The next step was to attach the ribbons that would tie in the back and add tatting to them to make them look little fancier.
Adding this little bit of tatting to the bows also gave me a chance to check off 4(!) more patterns in the Priscilla books. Technically, it’s two, but their both very simple patterns repeated in both the 1st and the 3rd book. Maybe that’s sort of cheating, but hey, my project, my math.
I don’t have the books in front of me so I’m not going to do the normal pictures of the figures in the books and the pattern as written. Maybe I’ll write it up in a future post, but I don’t think that’s really necessary. They’re pretty standard. Here’s the basic process I used to make them.
NOTE: I consider this whole piece just a proof-of-concept piece to get a rough idea of what would be involved in making some belts like this so I just used fabric glue on the ribbon. Normally I’d sew the tatting to it, but I was just looking for quick and dirty. I got both. 🙂
I think this was the second pattern in both the first and the third Priscilla books. The rings are all 3+3-3-3 with the first picot joining to alternating rows (so the 3rd ring joins to the 1st, the 4th ring joins to the 2nd, the 5th ring joins to the 3rd and so on). The only change I made was to leave out the first picot on the first ring of each row and the last picot on the last ring of each row. Then I folded the piece of tatting over the end of the ribbon and glued it down.
I wanted something that would cover both sides of the ribbon because it will flip around while your wearing it and this seems to work, though I don’t actually care much for the pattern. I’m just not generally a fan of uncovered threads and it was especially hard to get them to lay flat in this situation. But as I’ll say many times in this post, this was just a proof-of-concept version of the piece and in the future I’ll pick a more interesting pattern to use to cover the ribbons.
 Attaching the ribbon to the tatting was also pretty easy thanks again to fabric glue and a really simple tatting pattern. Like the ends above I first folded over the ends and glued them down to get rid of the rough edges. Then I passed the ribbon through the loop on the end of the tatting and glued it down onto itself. Added a another piece of very simple tatting just to cover the edge. This pattern is the very first pattern in both the 1909 and 1925 books. Rings of 3+3-3-3 with about 3/4-1 inch of thread between them. Hate the way the uncovered thread looks (and the glue), but once again, this was just the proof-of-concept so it works for this. Attached both ribbons the same way.
The original piece of tatting that makes up the main part of the belt is about 27 inches because I didn’t want the ends where it attaches to the ribbon to show from the front. Now that I’ve got a finished version though I’m re-thinking this. I actually think it work out pretty well and the ribbon attachments could be on the side or even a little bit on the front. A fancy motif over the end of the ribbon would be a nice accent to the sides of the best. AND that would have the added advantage of meaning less tatting would be needed for the main part of the belt. Instead of 27 inches next time I’m going to try something more like 18 inches.

 I forgot to take a close-up of the necklace I’m wearing in the first picture, but it’s actually the center part of the motif from the star doily I’m working on. I made it out of the same size 3 thread that the belt is made of so it’s pretty big and loved the way it came out. It’s nice to have such a bold piece of tatting. I wore it again on Tuesday with a red dress and got lots of comments on it.  I think I may have to start doing a lot more tatting in size 3. Originally, I picked size 3 for the belt just because I wanted it to work up really fast. As a proof-of-concept piece I didn’t want to spend a lot of time on this first “draft” and figured that when/if I made more I’d make them out of a smaller thread and more complicated pattern. I actually think now that size 3 totally works for the belt. I do plan on trying out some other patterns for belts but I think I’ll stick with the size 3.
Amazing! Once I learned how to tat nearly 10 years ago I used size 80 almost exclusively for many years. I switched to size 30 when I discovered and fell in love with Altin Basak thread and now I use mostly size 10 and 20 and am thinking of moving up to size 3 for a lot of stuff!
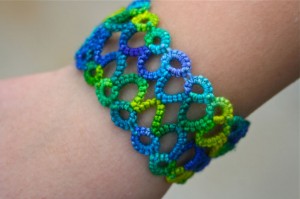
 Actually, I may even try working with Koigu’s merino yarn for some. Wildfiber, the yarn store in Santa Monica where I love to hang out and tat doesn’t carry any thread other than a small amount of embroidery thread. But they do have a really comfortable area for hanging out and knitting/crocheting/tatting so I wanted to find something I could buy from them. That way I wouldn’t feel too guilty about just coming in to hang out and use the couch space for tatting. :) I bought a remnant of the Koigu yarn to try tatting. I made a bracelet out of it a while back and really liked the way it came out.
It has to be either a relatively simple pattern or one that I know really well because it’s a pain in the butt to retro-tat with, but other than that it’s surprisingly easy to work with. It’s kinda expensive though (at least compared to tatting thread which is hours and hours of tatting time for under $5), so I’ll be test tatting a couple other belts before I make that plunge. I think it should work out to approximately the same size as size 3.
So stay tuned for that! I think with the right pattern, some beads and the Koigu yarn I’ll end up with some really elegant belts.
P.S. I promise in the future to come up with better names for big projects like this. “Sash Belt” is still bugging me, I think because it sounds like “Slash Belt”.


Gina Said,
February 16, 2011 @ 4:56 pm
Looks great!!!! For long term use, you’d probably need to attach it to fabric to keep it from turning but then you would be limited as to what you could wear it with. A white backing would not distract from this white skirt but you mentioned a red dress. The white belt background would actually make the tatting show up more on the red dress through. Cool idea!
admin Said,
February 16, 2011 @ 5:27 pm
Hi Gina,
Thanks! What do you mean by turning? It stayed put pretty well the day I wore it. I was a little concerned about it bunching up or folding since I spend most of my work day sitting, but it actually stayed put pretty well and the bow didn’t even loosen at all.
I agree though, with a ribbon behind it, it could really bring out the tatting. I have a couple other ideas for belts where the tatting is done with a smaller thread and is put onto a single ribbon that runs all the way around and ties in the back. And I also just recently finished a piece of tatting that I’m going to add to a belt that matches the dress. I’ve been putting off finishing it because it’s going to involve a bunch of sewing and I haven’t felt like doing that, but I do want to finish it sometime soon.
Snapdragon Lace » The New Belt is Finished (Sort of) Said,
May 21, 2011 @ 10:50 am
[…] whole thing was just under 18 inches. When I made my first belt I made the tatting portion of it 27 inches long so that it would be the largest part of the belt, […]