Possible Solution for Putting Together the Shawl
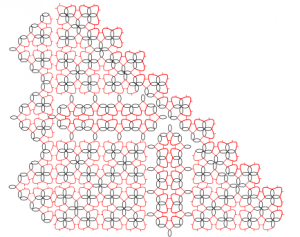
 In my last post about the shawl, I ended with the plan to play around with the pattern on the computer and see if I could come up with a way to connect all the pieces without actually picking up any shuttles or thread. Had a flight from San Diego to Seattle on Monday (Oh… Hey Seattle people! I’m in town till the 25th!) and had a chance to play around a bit. It might not make sense to anyone else, but I’m going to post it anyway. Here’s what I came up with.
There’s actually two triangle pieces and the square piece in there. They’re connected by two stripes which are made from a doubled-over edging variation on the same pattern. On the long side (diagonal from top left to bottom right) is another edging. This will actually be the top part of the shawl. On the left side is another fuller edging. Though I didn’t add it, this edging will be repeated on the bottom part of the picture. These two pieces are the edging around the two bottom parts of the shawl. (This picture is 45 degrees off from the final shawl. It was just easier to build the pieces that way.)
You might notice that the pieces that make up the three panels of the shawl are no where near as large as they are in real life. This was done on purpose because it didn’t make sense to diagram out the whole thing when I’m only interested in the corners and the connecter pieces between the panels. I just made smaller versions so I could more easily move them around and could see the whole thing on the screen at once (and at enough detail that it would make sense.)
So will it work? Well… Good question.
I think it mostly will, but because my drawings aren’t as precise/even as the actual tatting will be, I won’t be totally sure how it will fit together until I try it. I’m definitely closer to having something that works so I think playing around with it on the computer was a very good and time-saving exercise. I’m pretty sure that this will be the basic idea but the final version will still have a bit of tweaking. I’ll have to work out that part out with shuttles and thread.
 The BIG difference between the diagram and the real thing is that this diagram COMPLETELY mis-represents the sizes of the connectors in comparison to the panels. In the diagram, the large square is 2 motifs by 2 motifs. In real life, it’s 8×8. So the connectors and boarders won’t look anywhere near as large on the final version. (I’m hoping that will also draw attention away and help to smooth out any rough edges/connections.)
In fact, when I actually get started on the final piece, I may decide that the connectors and the boarder need to be bigger. After all, the two reasons I’m putting them there in the first place is to make the whole shawl a little bit bigger and (more importantly) to give a piece of white between the different-colored panels to make for a nicer transition between them and to have a piece of white around the piece as a whole to pull it together better.
Luckily, that’s something that can be easily adjusted later. Once I know how the actual pieces will fit together it’s not very difficult to change the sizes. As long as the edges of the connectors are the same I can make them pretty different from what’s currently there.
So, the next steps?
Well, next I have tat what’s on the diagram. I don’t want to try it on the actual piece, partly because I don’t want to stretch out picots by joining something I may take off (and if I’m going to have to cut away what I’m tatting now, I don’t want to end up accidentally cutting the actual piece.)
Mostly though, I just don’t want to have to that much for a trial run. It’ll be better to try it out on a smaller piece. If the corners aren’t going to work together the way I think they are, I don’t want to have tatted up a foot and a half of the edging just to get from one corner to another.
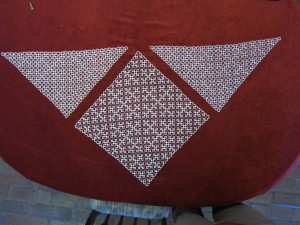
So now I put aside the three panels I have finished. Pull out some size 10 thread (the actual piece is in size 20) and tat up three new much smaller panels. I’ll play around with the edgings and connectors on these pieces and will hopefully get something that works. Stay tuned!
