Sash Belt (for lack of a better name)
 This was one of the rare occasions where I picked a pattern based on a project and not the other way around. I saw this listing on Etsy of a belt with a large bow in the back and wanted to do something similar in tatting. (Here’s another cool example from the same designer.) I wanted a piece of tatting in the front that would tie in the back with a large bow.
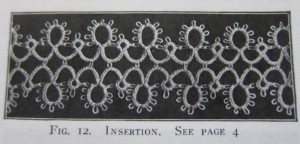
Because a belt is a fairly large piece of tatting I decided to do my proof-of-concept piece in size 3 thread. That way it would work up faster and if it was a disaster I hadn’t spent too much time on it. Size 3 thread meant finding a more simple pattern so I flipped through the Pricilla books and found this one on page 5 of the 2nd book.
I figured that in size 3 thread this would work up large enough to make for a bold belt and I picked a nice bright red to give a bit of color to a white skirt I wanted to wear it with. My idea was to tat this pattern for the about 3/4th of the size of my waist and then add red sashes to the ends that would tie in the back.
Here are the instructions as written in the book. In modern short hand they are:
*Ch 7-7
R 3-3-3-3
Ch 7-7
R 3(-3)x9*
Repeat between *s. Make a second row that attaches the picots of the chains.
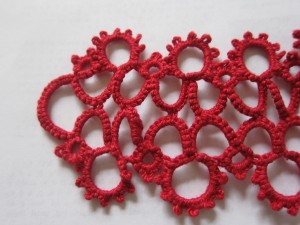
I don’t know who would actually want to start this pattern with a chain, so I started with the small ring and went on from there. If I were redoing the pattern now I would make the chains shorter. As you can see in the picture the chains sort of bunched up like there is too much curve in them for the short distance between the rings. (I wonder if it would help if I didn’t tat the chains as tightly.)
One of the things I learned in Sharon’s tatting design course was that if you have a chain and rings pattern and you want it to stay flat you need to have the number of stitches in the chain equal the number of stitches in the sections of the rings that make up the top part of the negative space created by the rings and chain. That’s a really complicated way to say it, but maybe if I explain it through this particular pattern. The first ring has 3 stitches after the picot that will become the join. The second ring has 3 stitches before the join. Together that’s 6 stitches. So if I wanted to do just one row of this pattern and wanted it to be straight I should have chains that connect the rings of only 6 stitches not 14 like this pattern calls for.
I wish I’d stopped and taken a picture before I’d finished adding the second row. Without the second row the pattern has a tendency to curve in on the ring side. (Which actually could be a pretty cool effect. I could see joining picots of the large rings to make the pattern circle around… I’m going to have to try that.)
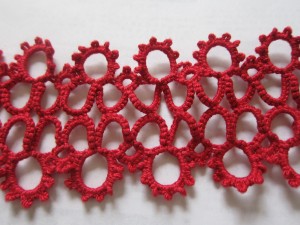
Anyway, the second row pulls it back and straightens it, but you can still see how it’s bunching in the front. If I were to do this pattern again I’d probably try 5-5 for the chains to see if that would help. Without the second row it would still bend but I think that with the second row it would work. I could try 3-3 which according to the calculations above should keep it flat, but it would also take away some of the height of the pattern and I would want to keep that for the belt. When working the leaf motif yesterday I learned that joining two rings with two joins instead of 1 gives the piece more structure and makes it stiffer. I wonder if that might work here too with chains of something like 5-4-5 and then 5+4+5. Just something else to try sometime.
 One of the things the book doesn’t mention is how to add on the second row. I guess they just expect you to tie off the end of the first row and then start the second separately. I didn’t want to do that because 1) Didn’t want to have to hide more ends than needed and 2) Wanted to create a loop to attach the sash part to later. Pictured is my solution. After the last ring of the row I did a chain of 20 unflipped double-stitches before starting up again with the first ring of the 2nd row.
I didn’t flip the stitches of this chain because I wanted it to curve into the rest of the tatting. This created the loop that I’ll eventually use to attach the sashes.
As a side note here I didn’t start the first row at the end. That doesn’t really make sense… When I was tatting the second row and was getting back to where I started I kept going and did an extra repeat so the last repeat of the second row made it longer than the first row. Then I did the unflipped stitches of the end and did what would become the first repeat of the first row. That way I was making the final knot and hiding the ends about an inch into the piece and not at the end. I think that might make it a little stronger since it’s the end that’s going to have the most tugging on it when the best is tied.
This is as far as I’ve gotten on this project. All the tatting is done, but I haven’t figured out how to do the sash part yet. I’m hoping to find something at Joanns that I won’t have to adapt much because I’m not too fond of sewing. If you have any ideas, please let me know. I’ll share the finished piece here when I’m done.


Kelly Said,
January 12, 2011 @ 5:46 am
I’ve been thinking about tatted belts/sashes as well. I wonder if running a ribbon through the tatting would be a solution? It would help prevent the tatting from being pulled out in an unattractive way. You might have to use a different pattern, however.
admin Said,
January 12, 2011 @ 2:12 pm
That’s one of the things I was thinking about as well. I’m thinking that the belt as it currently is might pull unless you’re careful. I always hate covering up tatting though… even if with a nice ribbon. BUT I was thinking that maybe you could tat something so that the rings that show on one side are one color and those that show on the other are another color. Could make a cool reversible belt. Also been wondering how difficult it would be to attach the tatting directly to the ribbon. Would it take a really long time to sew? (Probably.) Would fabric glue look bad? (Probably.)
I’ve seen lots of bookmarks with ribbon running through them though, so I know they’d look good. Definitely worth trying. Let me know if you do.