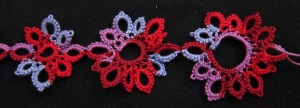
Archive for May, 2012

Christmas in May Continues

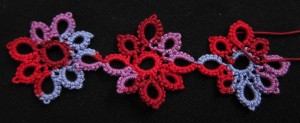
I’m making this one all in red and because I’ve been spending a lot of time watching lectures while studying for the CPA exams I’ve made quite a bit of progress on it.  It’s nice when studying involves tatting.  It’s much easier to get started for the day if I start with watching the lectures and tatting and can more quietly slip into the harder stuff (actually working the homework problems) a little later.

The original Priscilla pattern called for doing this with a single shuttle.  Make the center ring, make the rings along one side, and then come back around the other side leaving a bare thread on the back side between the flowers.  Nowdays we have split rings, so that whole thing can be done in one pass.  Here’s my modernized version:


Use two shuttles wound continuously.  

With shuttle 1:

R 2(-2)x8

Shuttle join to the last picot of the ring just made.

*R 2-4-4-2

Shuttle join to the next picot of the ring.

R 2+6-6-2, join is to the last picot of the previous ring.

Shuttle join to the next picot of the ring.

Repeat from * 2 times more.

R 2-4-4-2

With both shuttles:

Split ring of  2+6/2+6 the joins are to the open (lower) picots of the rings around this one.

**Split ring of  6-2/6-2

R 2(-2) x8, this can be done with either shuttle.

With either shuttle:

***Shuttle join to the last picot of the ring just made.

R 2-4-4-2

Shuttle join to the next picot of the ring.

R 2+6-6-2, join is to the last picot of the previous ring.

Shuttle join to the next picot of the ring.

R 2-4-4-2

Shuttle join to the next picot of the ring.

With the other shuttle, Repeat from *** on the other side of the ring.

Split ring of  2+6/2+6 the joins are to the open (lower) picots of the rings around this one.

Repeat from ** until desired length is reached.


Hopefully that’s not too confusing with the 3 different repeats.

One of the big “discoveries” of playing around with the patterns in the Priscilla book was finding these patterns that call for making a series of rings with a single shuttle that are joined BETWEEN the rings to a row of picots (either on another ring or on a chain) below them.  It’s such a neat idea for traveling with a series of rings and I like that you can’t see the bare threads at all.  I admit that I don’t explore pattern books as much as I should, but I don’t recall seeing this sort of thing anywhere else.

I also love edgings that are both symmetrical AND can be done in one pass.  I’m thinking this would make a nice belt.  I haven’t made one of those for a while.

I’ve started another version of this in green and red that uses single shuttle split rings to put the red in the center of each flower, but I don’t have pictures, so I’ll save that to share on another day.  I’m also working on diagramming this one out, but I don’t have it done yet, so that also will have to wait for another day.

Comments (2)

Christmas in May

I’ve been a bit obsessed with turning edgings into garlands for our Christmas tree lately.  I started with it back in November when I got to thinking that if I tatted up one new garland each year that in 30 years our Christmas tree would look pretty awesome.  I thought it’d be neat to have an on going project throughout the year to work on, but I’ve sort of been obsessed with finishing them lately.

I finished the two early this month and have now started two new ones.  Both are based on this pattern from the Priscilla books.  (#1 I think).  This is not the thread I’m using for the actual garland, this is just what I happened to have already wound CTM that I wanted to finish off.  Originally this pattern was written up as a single shuttle edging done in two passes.  Thanks to the modern magic of split rings it can also be done in

just a single pass.  I also played around with the idea of expanding it out so that it would have 6 points.  I thought that if it were done in white that it would then look like a row of snowflakes.  Not sure that the third one really pulls it off, but I may play around with it some more.  It doesn’t totally lie flat yet and seems to be a bit too straight on the edges.  Maybe with a different stitch count on the outside rings to make them more pointy.  Tomorrow I’ll share the pattern and the version of this in all red that I’m working on.  It’s going to look great on the tree.

Leave a Comment

The Holly and the Ivy

Here’s the second Christmas garland that I finished this last week.  In these colors it reminds me of holly and ivy.  This one uses a pattern from Priscilla Tatting Book number 2.  I’ve just realized that though I started using this pattern a while back, I never actually posted the pattern or my variation.

It’s always nice when I have very few changes to make on the original pattern.  That’s been the case a lot lately and I think this is because I’m still working on the tea cloth which has lots of changes so I’ve been picking easier patterns to work on as side projects while I struggle through that.  I’ve had my eye on a couple of more complicated projects and I’m trying hard not to start them until I’ve finished up some more of my other works-in-progress.

And here’s one of those former WIPs!  I started this soon after Christmas and decided to just keep going with it until I ran out of the red thread.  Ended up getting just under 7 feet of it.

Here’s the instructions.  My main change was to make the rings of the flower 7-1-7 instead of 8–8.  I don’t like to join all my rings to one center picot because then I have to guess at the right length to make it and because I think it’s stronger if you do a serious of picot joins instead of one large one.  Seems to also make it a lie a bit flatter and more even as well.  Except for that and a pair of Shoe Lace Tricks the pattern pretty much stayed intact.

*R  7-1-7

**Ch 3-3-3-3

R 7+1-7 (join to picot on previous ring)

Repeat from ** 4 more times for a total of 6 rings, joining the second picot of the last ring to the open picot of the first ring.

SLT

Ch 3(-3)x5

R 3+3-3-3 (join to the middle picot of the last chain of the flower.)

Ch 3(-3)x5

SLT

Repeat from * joining the second picot of the first chain in the flower (first 3-3-3-3 chain) to the ring between flowers.  Continue until desired length is reached.

That’s it!  Hope you like it!  Now that I finished off both the Christmas garlands that I started around Christmas last year I’ve been flipping through the Priscilla books to pick out the next on to do.  I think I’ve got a good one picked out, but since it involves changing a single shuttle pattern into one with split rings and maybe even three shuttles with split rings and single-shuttle split rings I want to make sure it works before I post in detail about it.

Leave a Comment

Take Something, Leave Something

I was flipping through pictures on my cell phone and found this one that I took of the Take Something Leave Something table at Shuttlebirds.  It was a great success.  I was very happy to get rid of a lot of Royal brand thread that I’m not going to use anymore and picked up a bunch of other stuff that I will use.

For the last 5 or 6 years I’ve been slowly paring down stuff by setting a rule that if I buy (or get without spending money) 2 things I have to get rid of (either by using up or giving away) 3 things.  By “things” I mean thread, yarn, books, cds and clothing interchangeably.  I keep a little tally going on my phone and this is the first year I’ve left Shuttlebirds “positive” (meaning I could have brought more home) despite the fact that I had gone there in the negative.

It’s a bit OCD, I know, but it’s worked really well for me over the last few years.  It’s never really stopped me from buying anything I want (that’s not really the point), but it helps me to stay on top of stuff by motivating me to clean things out and get rid of things I know I’m not going to use in the future.  My thread stash has definitely grown over the last few years, but I have gotten rid of almost all my yarn (except for some for tatting) as it became clear that I have very little interest in picking up crocheting again, and I have cleared out at least a bookshelf or so of books and cds.

Anyway, the best part about the table was that there wasn’t a bunch of stuff at the end that I got stuck with.  🙂  The second day we put out a donation bowl so that people could take something and leave a donation for Shuttlebirds.  I think that was a good way to do it.  The first day things needed to be replaced, but the second day you could leave money for Shuttlebirds.  I got the word out about it fairly late, but hopefully this was a good start to getting the word around.  I’m looking forward to seeing what appears on the table next year.

Leave a Comment

And 4 Weeks Later…

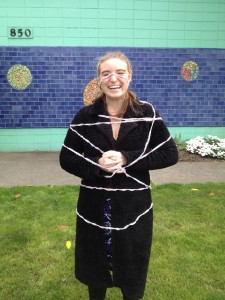
Busy month!  Lots to get caught up on from Shuttlebirds, Camp Wanna Tat and other projects, but I’m going to start with the Christmas garland from my last post.  Finished it!  I had been hoping to get it done before the end of Shuttlebirds but didn’t finish it until the day before the LPS meeting last week.  This was taken outside our meeting space after I showed it off to the group.  Nice to finally finish it.  It’s a cute pattern when finished, but it’s basically just all chains and when you’re making 30 feet of it (technically 60 feet, because you do one side and then the other) it gets a bit boring.  I probably should have just put it aside for a while and come back to it in a few months, but I’m trying to go through my started projects and actually get a bunch of them finished so it feels good to have this one done.

I had actually been working on two garlands and when I finished this one I got back to working on the other.  I was only making that one as long as it could be until I ran out of the red thread for it.  Did that this last week so I’ll share that next. Strange to finish both Christmas garlands so early in the year.  Guess it’s time to start on another!

Leave a Comment