Archive for April, 2012

Papers, Doctors and a Little Bit of Tatting
Today I’ll be finishing up my last papers for my masters degree (yay!) and heading to the doctor’s so see if they can do something for the cough I’ve had for the last week.  My voice has been pretty much shot for the last few days and I think it’s either pneumonia or bronchitis.  Pneumonia was going around the office about a month ago.  I thought I’d gotten away in time, but I guess it was just incubating until I got up to Seattle.  Hopefully they can give me something to take care of it quickly.

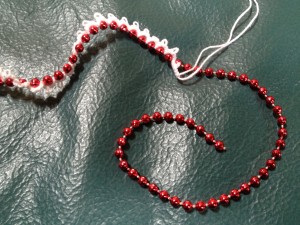
Over the weekend I did get a bit of work done on one of my garlands for Christmas this year.  I’m going through projects trying to empty shuttles for Shuttlebirds and picked up this one where I’m covering a beaded chain with Krystle’s rhinestone bracelet pattern.  It’s a nice easy chains-only pattern that I could do while zoning out on the couch and it goes quickly enough that it feel like you’re really accomplishing something.  Even so, I didn’t QUITE get to the end where you turn around and come back.  Maybe I’ll sit down with it for a few minutes tonight and finish of the first pass.  No real rush because 1) Even once I get to the end I’ll be turning around and coming back along the other side, so I still have 30 feet to go, and 2) It’s for Christmas, so there’s plenty of time.  I just wanted to clear off some shuttles.

I’ll be leaving tomorrow to go to Illinois for a funeral and won’t be back to Seattle until after Shuttlebirds and Camp Wannatat so tonight I’ll be packing up for the next two weeks.  Probably won’t get around to finishing off that last foot before the turn.

Comments (2)

Whoops… Quick correction.

Quick correction in the pattern yesterday.  I forgot to add a line about a picot that is a regular picot in the first repeat and becomes a join in each repeat of the pattern after that.  I added it in red to yesterday’s pattern, so hopefully it doesn’t confuse anyone.

Wasn’t feeling well today, so the first half of the day was a waste.  Second half went much better.  I have an order for another pair of fingerless gloves so I’ll be starting work on those as soon as I clarify the details with the buyer.  I visited Pacific Fabrics and picked up some nice elastic for the project that I’m working on the Priscilla edging for.  Since I  think it’s going to actually work out, I’ll finally announce here that I’m trying to make a headband out of it.  I haven’t decided yet if it’s going to be just a single row of the edging or if I’ll double it over and do a second row.  We’ll see how long it takes me to finish off the first one.  I think it will look nice with either.

Leave a Comment

Priscilla Edging Pattern

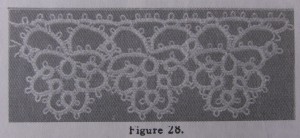
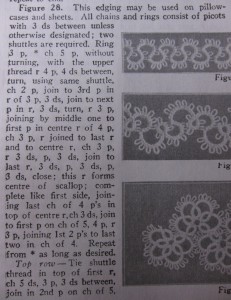
Here is the pattern to the edging from yesterday as written in the Priscilla books and as translated into modern notation by me.  I stuck to the pattern pretty straightly with the exception of adding two shoe-lace techniques to make it so that I could use a ball and shuttle instead of two shuttles.

R 3(-3)x3

*CH 3(-3)x5, SLT

R 4(-4)x4  (This is called the “large ring” from here on out)

CH 4-4-4+4+4, joins are to the 2nd and 3rd picot of the first ring.

R 3-3+3-3, join to the first picot of the large (second) ring.

CH 3(-3)x3 (Starting with the first repeat, the first picot of this chain will be a join to the previous repeat.)

R 3+3+3-3, the first join is to last picot of previous ring and the second is to the next picot of the large ring.

CH 3(-3)x3

R 3-3+3-3-3, join to the open picot of the previous ring.

CH 3(-3)x3

R 3+3+3-3, the first join is to the second to last picot of the previous ring, the second picot is to the next picot on the large ring.

CH 3(-3)x3

R 3+3+3-3, the first join is to the open picot of the previous ring, the second picot is to the next picot on the large ring.

CH 3(-3)x4 SLT

Join to the start of the large ring

CH 3+3(-3)x4, join is to the last picot of the first chain.

R 3+3+3-3, joins are to the first and second picot of the chain before the SLT.  When doing the next repeat, there will be another join to the second join in this ring.

Repeat from the * until desired length of edging is reached.

A relatively easy pattern and it’s nice that there weren’t many changes to be made.   I’m finding that the tricky part is in not making any mistakes because every ring is different in the pattern and there’s a lot of easy mistakes to be made.  (Too many picots in a ring, using 3 ds like everywhere else in the pattern in the one ring that’s supposed to have 4 ds between picots… that sort of thing).  Nothing too complicated, but each part different enough that you have to pay attention to it.

I’m still working on my original project idea using this pattern, but since I’m still not far enough along that I know it will work I’ll continue to stay mum about it.  I do think that a single repeat of this pattern will make a nice necklace pendent, so it’s possible I’ll work on that tomorrow, however I did get an order for a pair of fingerless gloves today, so if I can get the details of that sorted out tomorrow I’ll probably start on those instead of working more on the Priscilla projects.

Leave a Comment

New Priscilla Edging

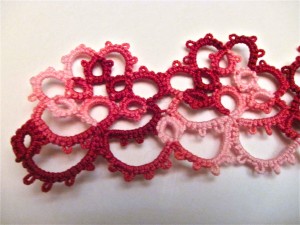
Yesterday I got started on a new edging from Priscilla Book #3. I don’t usually use variegates and I almost never use them on a new project when I’m working out the pattern, but for the project I have in mind it felt like it would work.  I’m not going to say what the project is just yet, though, just so that I can make sure that it’s going to work out first.  Also, I came across a bag of Flora threads and wanted to work with them.

I was pleasantly surprised not to have to make any changes in the pattern as given in the book.  Well, one small change, just a SLT to let me use a shuttle and ball instead of two shuttles.  It’s late now, but I’ll write out the pattern tomorrow.  I think that just a single repeat will work as a nice necklace pendent.  When I’m done experimenting with this current project then I’ll try that out and also see what it will look like with two solid (or maybe one solid) color.  It’s a fun pattern and I like it.

Comments (4)

Looking for Website Inspiration

I’m planning on re-doing snapdragonlace.com to be more of a website than just a blog.  I’m still in the planning stages, listing all the things I’d like it to have, figuring out the set up of the pages and links and picking out a format.  I’ve been paying a lot more attention to the websites of other designers and pulling ideas from what I like about them.

Here’s three of my favorites:

Gertie’s New Blog for Better Sewing. – This is a straight blogger blog, but I like the layout.  I especially like the pictures on the left as you scroll down that take you through her projects from Vogue’s New Book of Better Sewing.

Sheep to Shawl from Donna Druchunas – Full-blown website and a little more like what I’m thinking of as far as the overall website goes (separate pages, etc)

I Am The Lab – This is another full website.  I don’t think my front page would be quite so picture heavy, but I like the layout of their links at the top.

I found the first two of these websites through the Craftsy classes they’re teaching.  When I get some more time I may take Donna’s class on knitting socks.  One day maybe I’ll get to sewing.  I definitely like Gertie’s take on modernizing the old designs.

Part of the point of this blog entry is just to get these websites down in one place where I can find them later, but I’m also looking for ideas.  So, Dear Readers, my question for you is what makes a good website for you?  What do you find appealing and what makes a website easier to navigate?  Have any favorites?  Obviously, it doesn’t have to be tatting related, but it really doesn’t have to be even design related either.  Brainstorming time.  🙂

Comments (4)