Leaf motif
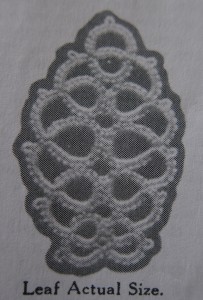
 I started work on a large piece that I was going to write up today, but since it still has a fair amount of tatting left I decided to put it aside and work up this quick motif. This little leaf has been catching my eye every time I flip past it on page 15 of Priscilla Tatting Book #3. It’s part of the large centerpiece on page 14 and I’ll get to the centerpiece eventually, but today I just wanted to tackle this leaf. I keep seeing it as a petal and want to try making some flowers out of it eventually.
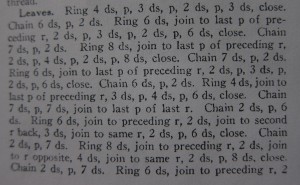
For the size of this simple-looking leaf it has some mightly long directions. This is the sort of pattern that makes you crave a diagram. It would be so much easier to follow. I didn’t even try to start tatting directly from the book. Before even attempting it, I wrote out the pattern in shorthand so I could have it in front of me while looking at the picture. It’s still sort of a pain in the butt to follow since every ring is different (well, one half of the leaf is the mirror image of the other, but since there’s joins on the second half that aren’t there on the first half, even in the shorthand version you have to write out each ring and chain separate.
R 4-3-2-3
Ch 6-2
R 6+2-3-2-6
Ch 7-2
R 8+2-4-2-8
R 6+2-3-2-6
Ch 6-2
R 4+3-4-6
Ch 7-7+(to last ring, I recommend a shuttle join) 2-6
R 6+(to last ring) 2+ (to opposite ring) 3+ (to second picot on opposite ring) 2-6
Ch 2-7
 R 8+(to last ring) 2+ (to opposite ring) 4+ (to second picot on opposite ring) 2-8
Ch 2-7
R 6+(to last ring) 2+ (to opposite ring) 3+ (to second picot on opposite ring) 2-6
Ch 2-6
R 3+ (to last ring) 2+ (to opposite ring) 3+ (to second picot on opposite ring) 4
Ch 6-2 + (to base of first ring made) tie and hide ends
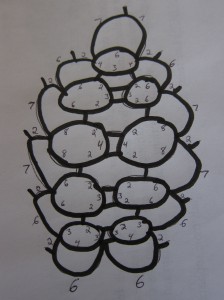
Still annoying to follow, huh? Fortunately for you, I decided to make a drawing. Unfortunately for you, I’m not very good at drawing. Sorry about that. Hopefully it’s still a little helpful. (Click on the picture once and it will take you to a window with just the picture where if you click on it again it will zoom in.)
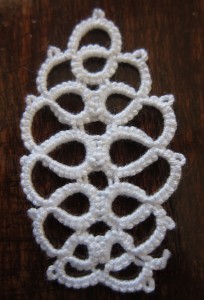
One thing that annoyed me when I finished is that because the last chain has only 2 stitches after the last picot there was no place at the end for me to use the magic thread trick to hide the ends. You can maybe see in the picture below that I just tied and cut them since this was just a practice round. When I started tatting it from the pattern I didn’t even take the time to figure out which ring I was starting with, I just did it like a tat-it-and-see and didn’t worry about the end. Looks like if I want to hide my ends I’m going to have to plan ahead and put in a magic thread in either the first ring or chain. I think it would probably show less in the ring. A little annoying since I don’t like to have a magic thread hanging out while I’m tatting. I’m always worried it will slip out, but I guess that’s what I’ll need to do for this pattern.
 I love those little picots on the chains though. I’m not usually much for decorative picots but those little ones really make a huge difference in leaf. Gives the edges a more crisp feeling that sort of looks like an oak to me. I also thought the double joins between the rings was interesting. This motif seems a little more solid and stiff than most and I think that’s part of the reason why. Gives the piece a little more structure which is nice.
Well, this is just a small section of the final centerpiece, but since there’s so many of these leaves (and the rose motif that I will tackle another day) I thought I might as well get started. It will be good for me to have a large project that I can keep coming back to for those days when I want some tatting that will let me zone out and don’t want to work my way through a new pattern. I’m not actually at the zoning out stage with these leaves though because I still need to figure out how to put them together with the roses for the final piece. The instructions just say to make all the smaller motifs and “join” them. I think that they’re using the term “join” generally, and not as a picot join so I guess that just means with a needle and (sewing?) thread. Seems like there should be a more elegant way to do that, but I’m leaving that for another day.


Margaret Davies Said,
May 22, 2014 @ 7:54 am
Thank you for writing up the pattern. Lovely leaves
Margaret
Jessica Said,
May 22, 2014 @ 8:18 am
Hi Margaret, No problem! Glad you like them. 🙂
Phyllis Said,
May 22, 2014 @ 10:59 am
Nicely done. I can see many uses for this leaf. Thanks for taking the time to write it up and share with Tatland.