Archive for Priscilla Project

Close-up!

Fair Close up 2
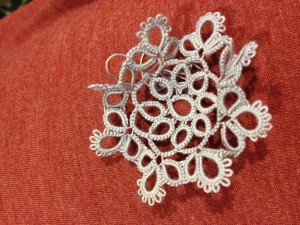
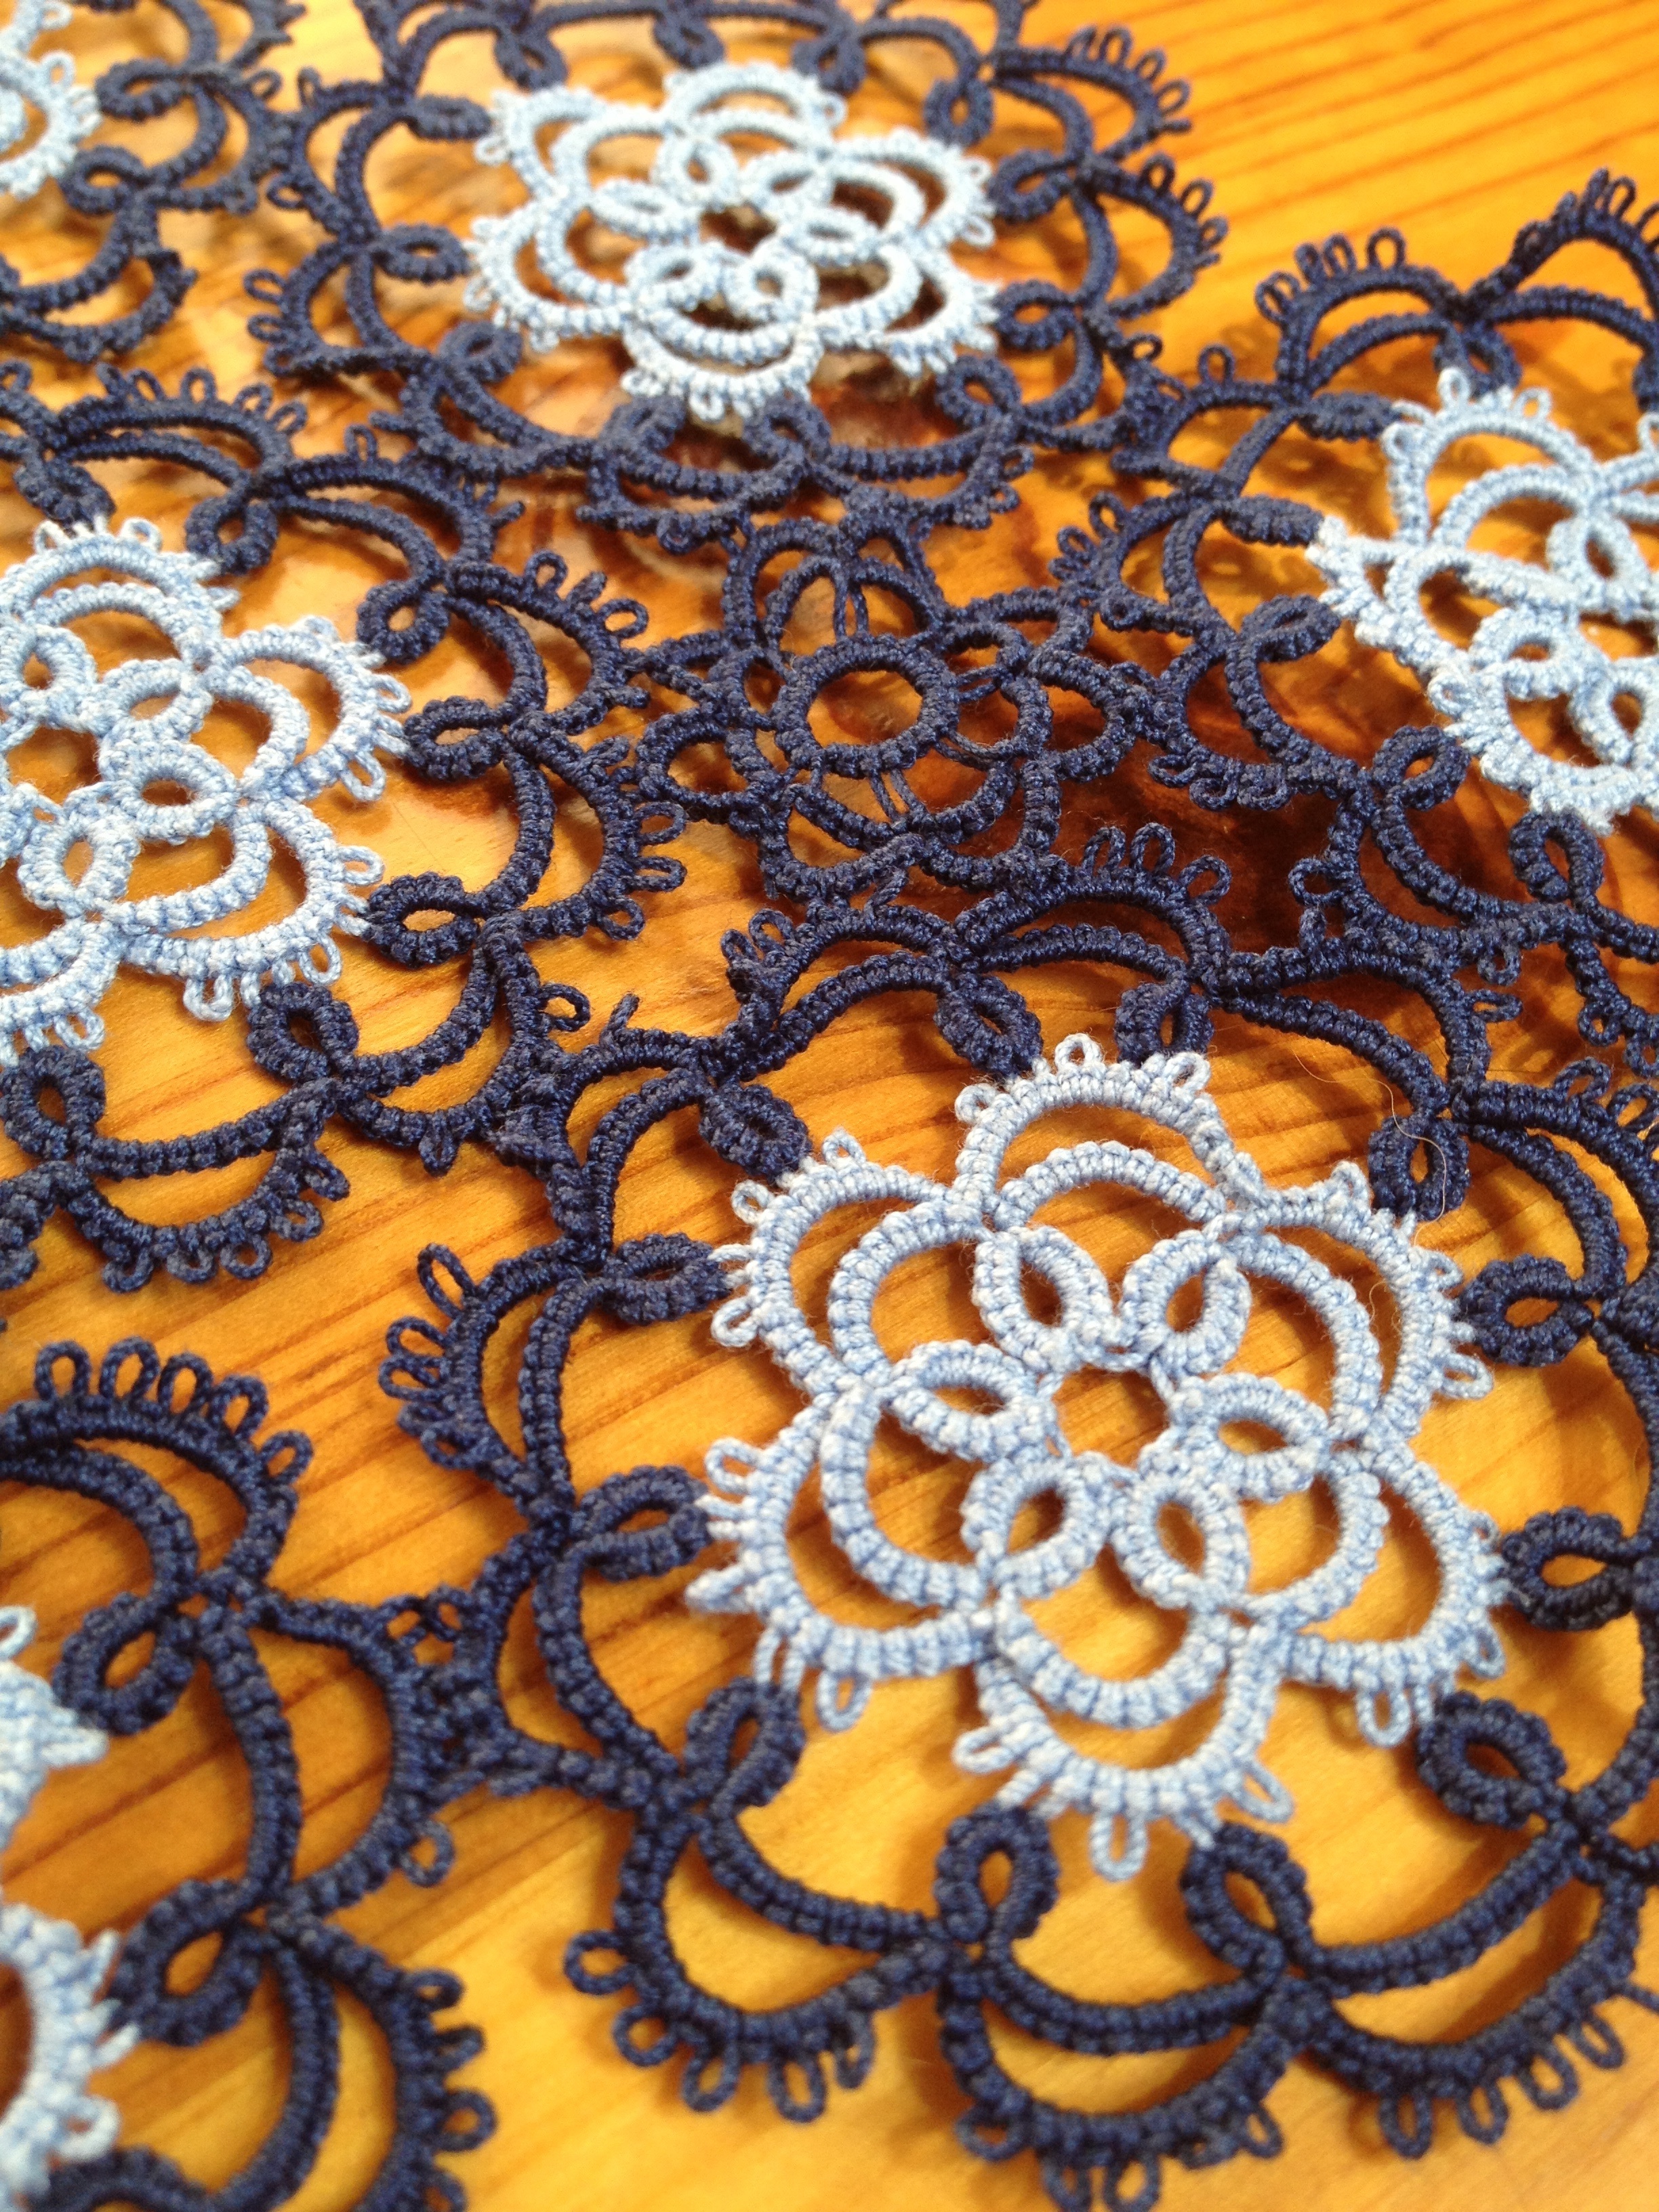
I took a picture of a close up of the fair piece so you can see what the motifs look like.  The pattern is from Priscilla Tatting Book #3 (1925).  I like this motif a lot and have made a bunch of pendants out of it it as well.  The final piece was 30 of these motifs and 5 of the smaller one you can see in the middle of this picture.  I made a bunch of extra light blue centers so when I was done with the fair piece I turned these into necklaces, by putting together 3 of them in different arrangements.  Pictures are needed for those too, but I still have to sew in the ends, so I’ll wait to take the pictures until I have that done and I put them on chains in their finished form.


Comments (4)

Fair Entry… for 2014

Fair EntryWhoops.  Well, I finished my entry for the fair, but didn’t realize I needed to get it registered by Wednesday.  I had it down as Friday.  So, instead, that means that I’ve got my bit fair entry for next year done.

Bummed I’m missing this year’s fair.  Mostly because last year there weren’t many tatted lace pieces for show at the fair and there’s talk of them canceling the categories.  Hopefully it sticks around another year and I’ll be able to help the tatters make a good showing then.

In the meantime, this means that I get another year to sew something to the center of this piece.  This piece is from the Priscilla Tatting Book #3.  They suggest a piece of linen in the center and I’ll do something like that, but I haven’t quite figured out yet how to do the sewing. I guess that with a year to do it, I have some time to do some practice pieces.  Also gives me time to write up the pattern.

This piece was done in size 20.  I’ll take some close-up pictures sometime soon too.

Comments (2)

Well, it’s a start…

First Attempt

This is my first attempt at a new motif from Priscilla Tatting #3.  I started off tatting it exactly as written, but it became very clear very quickly that it wasn’t going to stay flat using that pattern.  It always amazes me.  They must have seriously blocked the wrinkles out of their pieces in the early 1900s.

Half way through I made a couple adjustments and you can sort of see that one side is flatter than the other.  I’m going to tat it again with a couple other changes and see if I can get it to lay flat.  My plan is for this to be a necklace pendant so it’s going to need to be able to get by without any blocking.

I’ve been AWOL here on the blog and I’m sorry for it.  There’s been a lot going on in both my tatting and non-tatting life.  In my tatting life, I’ve been very busy teaching classes and preparing for teaching.  (Next beginner class is this Saturday at Bird Tail Beads in Bellevue.)  In my non-tatting life, I have my last CPA exam on Friday the 23rd so I’ve been trying to stay pretty focused on studying.  Hopefully, once the exam is done I’ll have a bit of a chance to catch my breath and you’ll hear from me more!

Comments (1)

Looking for a Test Tatter for Earrings Pattern

I’m looking for a test tatter or two for the earrings I posted earlier this week.  I plan to send the pattern to the IOLI who are looking for lace patterns to include in their CD for this year’s convention.  Don’t know if they’ll choose it, but it would be awesome if they did.

Submitting them means that I would need feedback on the pattern in the next day or two.  Anyone interested?  I’m pretty sure the pattern is free from any mistakes, but would like to have someone else tat it to be sure and to check for any wording that is awkward or unclear.  They earrings should take under an hour to make, I think.  I’m not always a good judge of that, but they’re not very complicated.  The pattern does include split rings and shuttle joins.

I’m going to make this the free pattern pulled out of the book of other patterns inspired by this edging from the Priscilla Tatting Book, so if you can’t get to it in the next couple days, don’t worry, this will not be your last opportunity.

Leave a comment with your email, or send me an email at jessica@snapdragonlace.com.  Thanks!


Comments (4)

So What Exactly Am I Doing Here?

As I mentioned yesterday, I’ve been focused the last couple days on an easier pattern from Priscilla Tatting Book #3.  In yesterday’s project I doubled it over to make a bracelet.  In today’s project I just added a second row of all chains to finish it off.  I think I might actually like this one better than the doubled over version.  I’ve been playing around with two colors as well and think that this version does quite well with two colors.  (Sorry for the poor lighting in the pictures lately.  It gets dark around 4:30 here now and I haven’t been getting anything photographed during the day.  Perhaps it’s time for me to invest in a lightbox.

I’ve probably latched on to the quick and easy because I’ve been giving some more thought to what I want the final product of this whole Priscilla project to be.  I still have the pie-in-the-sky idea of rewriting ALL the patterns in all 4 books (Priscilla Tatting 1-3 and the Tatting and Crochet Yoke book), but am starting to settle down and try to figure out what is practical.  If I can get it all together I’d like to publish it in book form (either printed or PDF), but have been giving some thought to what is actually a viable (sellable) useful product for tatters.  I have no doubt that with a lot of the patterns what I am doing by modernizing them is completely useful, but some of the little projects like this edging don’t really need any changes on their own.  (That being said, the adaptations for projects like this bracelet and my own and I think they’re fun, even if not particularly complicated or hard to come up with.)

So what should I do?  Focus in only on the complicated, incorrect or difficult projects?  Or do everything including the easier patterns like this edging?  I wouldn’t really feel comfortable charging money for the patterns for these easier ones that don’t require much (if any) modernizing, but also think that if I can do all the patterns in the books that tatters would appreciate having a complete set of all the modernized Priscilla pieces.

What I think I’ve come up with is this: I’m going to go ahead and write-up the easier patterns the same way that I’m doing the more complicated ones.  They are interesting to do, good practice for pattern writing of the bigger pieces, and most of all, a good motivation for me because they are easier to finish and will help keep me on track.  These ones I’ll release for free on my website and on Craftsy.com.  I figure they’ll be good advertising for the Priscilla project.

When I put together the finished Priscilla project these will be included with the others in the PDF, but not calculated into the price of the PDF.  If I get printed versions (my ultimate goal) then they will have to go into the calculation of the price because of the cost of printing, but it will all depend on the pricing/print run, etc.  Of course, that’s way too far in the future with way too many unknowns to even think about.

I have no idea how much of this is just me dreaming about ridiculous goals, but I really hope I can pull this off.  Is this Priscilla project just my own obsession or will other tatters get enough use out of this modernization of the patterns to make it worthwhile?  I’d hate to put all this work into it just to find out no one else is interested.  I guess that is something else that releasing these free patterns will help me gauge as well.

Comments (5)

New Pieces, New Patterns

It’s been a busy couple weeks!   A week ago from Friday I took my 2nd CPA exam.  I think it went ok, but haven’t gotten my scores yet.  Hope that I passed, but if I didn’t I certainly did learn a lot in the process and should have an easier time at retaking it so not too worried yet.  This last week I’ve started studying for the next one, but since I have about a month have also set aside some time for tatting.  I’ve been working on a couple new patterns or variations on old patterns, but what I’ve been a bit obsessed with over the last couple days is a couple of variations on a very simple pattern from Priscilla #3.  Figure 21 is a simple edging that I’ve done two bracelet patterns from.

Not sure why I’ve hooked on to this pattern so much over the last couple days, but it’s quick and easy and makes a nice piece.  I think that I’ve just been in the mood to appreciate something that’s quick and easy with everything going on with the tests, work, recovering from hosting the family Thanksgiving dinner and getting ready for our Christmas vacation.

Leave a Comment

Complete set! Well, pretty close…

20121118-201808.jpg

It has been a very busy week with work and getting our house ready for hosting Thanksgiving. (We will be sleeping 8 in what is technically a 0 bedroom house!) Not a whole lot of time for tatting, though I’ve been working on a few small projects. I’m excited to report though that I received this original copy of Priscilla Tatting #3 in yesterday’s mail. Sometime between 1924 and today it lost its cover and to be honest, I haven’t unwrapped it from its sarn wrap packaging to check if all the other pages are there, but for some reason Priscilla Tatting #3 has been the hardest of the four to find.

So now I have a complete set of book 1-3 and the crochet and tatting yoke and collar book. If anyone knows of any other Priscilla tatting books, please let me know. I have one of the Modern Priscilla magazines, and may eventually decide to collect more. They’re pretty interesting to flip through. I also have a couple of the Coats and Clark Priscilla booklets, but don’t plan on collecting those.

I actually have been picking up multiple copies of book #2. There’s a couple different publishers who printed the Priscilla books and at least two significantly different versions of book #2. Haven’t determined yet if there’s multiple versions of the others. Which actually leads me to my next reader question.

I’m also looking for more information on the Priscilla Publishing Company. If anyone has any ideas on where to find more info that would be wonderful. There’s not a lot on the web, but I’ve found they were based out of Boston and thought there might be some more local historical sites out there. When I finally get the big Modernizing of the Priscilla patterns out there I’d like to be able to include information about the publishing company, the women writing the patterns and he women who read the magazine. Any ideas welcome.

As a side note, this is the first post I’ve made on my iPad using the WordPress app. Hopefully the picture and formatting will come out alright. I’m pretty excited about the possibility of being able to post from the iPad while on the go!

Leave a Comment

More Unfinished Projects

This is the unfinished version of Mary Konior’s Spinning Wheel that I started last week in yellow and white.  I like the way it’s turning out.  I just ran out of the yellow thread on the shuttle and haven’t gotten around to finishing it off yet.

The yellow of this project was the left over from another piece.  An edging around a handkerchief that I’ve been working on for a while and finally finished the tatting for.  I didn’t realize quite how much tatting there was to a get around a handkerchief!

This handkerchief has been on my list of projects to finish for a while.  Now that the tatting is finished the next step is to get it actually sewn onto the handkerchief.  The pattern is from one of the Priscilla books.  It took me a while and quite a few attempts to figure out how to do the corner.  It’s always nice to find a single shuttle pattern that I like.


Comments (1)

Routines and Size 80 Thread

I think I’ve finally gotten a study routine down. And since for the next 6-8 months my life revolves around the CPA exams (hopefully I can finish in 6) that means I know what my life will look like for that time.

Sunday-Friday mornings are my primary study time.  I have scheduled out what I want to get done each day and if all goes well I finish by noon or maybe 1.  Afternoons when I’m usually the least mentally responsive are time for errands, with a sprinkling of review, catch-up (where needed) and working ahead (where possible).  I’ve always been both a morning and a night person and it’s during the afternoons that I slow down so this new schedule of using the afternoon for things like grocery shopping and going to get the car’s oil changed have been working pretty well.  Until last week I was trying to get more studying done in the afternoons and it just wasn’t working and leaving me stressed out because I wasn’t getting everything done.  This week I’ve also gotten a fair bit of studying done during the evenings which has been nice, but that’s because Noah has been out of town on business.  He’ll be back tonight and I’ll probably have to adjust my schedule for next week a bit.

The good news with all of this talk about studying is that it means that I’ve figured out how to get my studying in a less stressful manner and now I don’t feel guilty about the time I’m tatting.  Pictured above is a bracelet in size 80 that I just finished.  Well, technically I finished the tatting about a month or so ago, but until a week and a half ago I hadn’t actually gotten the ends sewn in. During a lacemakers meeting I borrowed someone’s magnifying glasses and was finally able to get them tucked in nicely.  It’s been a while since I’ve worked with 80 and I’d forgotten how much I like it.  For years when I first started tatting it was all that I would work with.  This project inspired me to pull out some of my copious amounts of the stuff and start playing around with some more smaller threaded projects even though I’m trying not to get too many new project started.

The pattern for this bracelet comes from the Priscilla books.  I started at the hook and worked across on one side and then did the same on the other.  I’m especially pleased with the bit I came up with for attaching it to the hook.  Being able to do a bit of filler with some lock-stitch chains means the project is a bit more adjustable since the hook attaches directly to the lace to fit around the wrist and the overlap isn’t bulky.   The split rings are a convenient way to hide the ends at the start of each side.  I’m thinking of doing a necklace of a similar style, but it would end up being a choker, which I don’t really wear and I’m not sure yet I want to put that much time into a piece I’m not likely wear.  I’ve been thinking about some variations that might work, so we’ll see if that’s something I’ll get around to eventually.

Comments (2)

Christmas in May Continues

I’m making this one all in red and because I’ve been spending a lot of time watching lectures while studying for the CPA exams I’ve made quite a bit of progress on it.  It’s nice when studying involves tatting.  It’s much easier to get started for the day if I start with watching the lectures and tatting and can more quietly slip into the harder stuff (actually working the homework problems) a little later.

The original Priscilla pattern called for doing this with a single shuttle.  Make the center ring, make the rings along one side, and then come back around the other side leaving a bare thread on the back side between the flowers.  Nowdays we have split rings, so that whole thing can be done in one pass.  Here’s my modernized version:


Use two shuttles wound continuously.  

With shuttle 1:

R 2(-2)x8

Shuttle join to the last picot of the ring just made.

*R 2-4-4-2

Shuttle join to the next picot of the ring.

R 2+6-6-2, join is to the last picot of the previous ring.

Shuttle join to the next picot of the ring.

Repeat from * 2 times more.

R 2-4-4-2

With both shuttles:

Split ring of  2+6/2+6 the joins are to the open (lower) picots of the rings around this one.

**Split ring of  6-2/6-2

R 2(-2) x8, this can be done with either shuttle.

With either shuttle:

***Shuttle join to the last picot of the ring just made.

R 2-4-4-2

Shuttle join to the next picot of the ring.

R 2+6-6-2, join is to the last picot of the previous ring.

Shuttle join to the next picot of the ring.

R 2-4-4-2

Shuttle join to the next picot of the ring.

With the other shuttle, Repeat from *** on the other side of the ring.

Split ring of  2+6/2+6 the joins are to the open (lower) picots of the rings around this one.

Repeat from ** until desired length is reached.


Hopefully that’s not too confusing with the 3 different repeats.

One of the big “discoveries” of playing around with the patterns in the Priscilla book was finding these patterns that call for making a series of rings with a single shuttle that are joined BETWEEN the rings to a row of picots (either on another ring or on a chain) below them.  It’s such a neat idea for traveling with a series of rings and I like that you can’t see the bare threads at all.  I admit that I don’t explore pattern books as much as I should, but I don’t recall seeing this sort of thing anywhere else.

I also love edgings that are both symmetrical AND can be done in one pass.  I’m thinking this would make a nice belt.  I haven’t made one of those for a while.

I’ve started another version of this in green and red that uses single shuttle split rings to put the red in the center of each flower, but I don’t have pictures, so I’ll save that to share on another day.  I’m also working on diagramming this one out, but I don’t have it done yet, so that also will have to wait for another day.

Comments (2)