Archive for Progress on Big Projects

Hat Brim (Tatting) Finished!


I know it looks pretty much identical to the last picture I posted about this project, but now it’s actually done.  That’s the problem with a project this dense.  It took a TON of tatting to feel like I was making any progress on it.  That was fine when it was the tatting I worked on during class but when I decided to just finish it up I was thinking I only had 2 or 3 hours of tatting left on it.  Turned out to be about 3 times more than that, but it’s done now and I like the way it came out.

I strung all the rings of the first row on to a thread so I could keep them bunched up.  That made it easier to move around, but that’s also what made it feel like I was going so slow.  I only had 6 inches left, but those were bunched up inches so they were really a couple feet.  The whole thing was maybe 2 feet bunched up, and about 6 or so in reality.

The next step is a bit of light sewing to attach it to the hat.  Unfortunately, the hat is in San Diego and I’m in Seattle for another two weeks so it’ll be a while before I get to that.  I’m excited to have the tatting for the project done though.  It’s been at least 6 months since I started it.


Leave a Comment

Possible Solution for Putting Together the Shawl

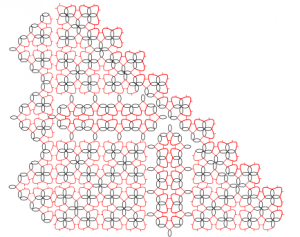
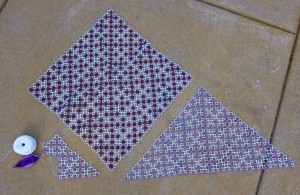
In my last post about the shawl, I ended with the plan to play around with the pattern on the computer and see if I could come up with a way to connect all the pieces without actually picking up any shuttles or thread.  Had a flight from San Diego to Seattle on Monday (Oh… Hey Seattle people!  I’m in town till the 25th!) and had a chance to play around a bit.  It might not make sense to anyone else, but I’m going to post it anyway.  Here’s what I came up with.

There’s actually two triangle pieces and the square piece in there.  They’re connected by two stripes which are made from a doubled-over edging variation on the same pattern.  On the long side (diagonal from top left to bottom right) is another edging.  This will actually be the top part of the shawl.  On the left side is another fuller edging.  Though I didn’t add it, this edging will be repeated on the bottom part of the picture.  These two pieces are the edging around the two bottom parts of the shawl.  (This picture is 45 degrees off from the final shawl.  It was just easier to build the pieces that way.)

You might notice that the pieces that make up the three panels of the shawl are no where near as large as they are in real life.  This was done on purpose because it didn’t make sense to diagram out the whole thing when I’m only interested in the corners and the connecter pieces between the panels.  I just made smaller versions so I could more easily move them around and could see the whole thing on the screen at once (and at enough detail that it would make sense.)

So will it work?  Well… Good question.

I think it mostly will, but because my drawings aren’t as precise/even as the actual tatting will be, I won’t be totally sure how it will fit together until I try it.  I’m definitely closer to having something that works so I think playing around with it on the computer was a very good and time-saving exercise.  I’m pretty sure that this will be the basic idea but the final version will still have a bit of tweaking.  I’ll have to work out that part out with shuttles and thread.

The BIG difference between the diagram and the real thing is that this diagram COMPLETELY mis-represents the sizes of the connectors in comparison to the panels.  In the diagram, the large square is 2 motifs by 2 motifs.  In real life, it’s 8×8.  So the connectors and boarders won’t look anywhere near as large on the final version.  (I’m hoping that will also draw attention away and help to smooth out any rough edges/connections.)

In fact, when I actually get started on the final piece, I may decide that the connectors and the boarder need to be bigger.  After all, the two reasons I’m putting them there in the first place is to make the whole shawl a little bit bigger and (more importantly) to give a piece of white between the different-colored panels to make for a nicer transition between them and to have a piece of white around the piece as a whole to pull it together better.

Luckily, that’s something that can be easily adjusted later.  Once I know how the actual pieces will fit together it’s not very difficult to change the sizes.  As long as the edges of the connectors are the same I can make them pretty different from what’s currently there.

So, the next steps?

Well, next I have tat what’s on the diagram.  I don’t want to try it on the actual piece, partly because I don’t want to stretch out picots by joining something I may take off (and if I’m going to have to cut away what I’m tatting now, I don’t want to end up accidentally cutting the actual piece.)

Mostly though, I just don’t want to have to that much for a trial run.  It’ll be better to try it out on a smaller piece.  If the corners aren’t going to work together the way I think they are, I don’t want to have tatted up a foot and a half of the edging just to get from one corner to another.

So now I put aside the three panels I have finished.  Pull out some size 10 thread (the actual piece is in size 20) and tat up three new much smaller panels.  I’ll play around with the edgings and connectors on these pieces and will hopefully get something that works.  Stay tuned!

Leave a Comment

Mystery Project

As usual I have been flipping between projects so it should surprise no one that I haven’t done anything new on the big projects that my two previous posts were about.  Still been tatting, of course, and here’s what I have been doing:

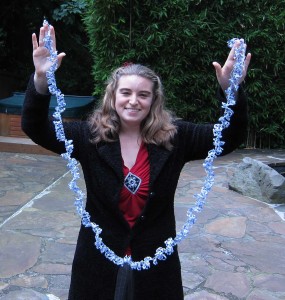
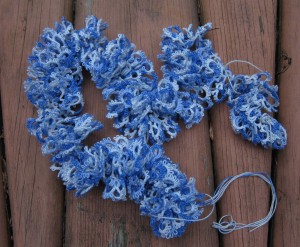
So what is it?  Well, I’m not sure.  I started it with one purpose.  Hit a snag and decided that it would be something else.  Now I’m going back to the first.  Physically, it’s a very long piece of a very ruffled edging.  Here’s a close up:

I’m not actually sure how long a piece it is.  For the original plan I didn’t need an exact length because the whole thing was going to be bundled together for an ruffle-y effect.  So I just tatted up a long length of R3+3-3-3, CH4-2-2-2-2-4.  I ran a thread through all the rings so I could keep in all contained while tatting the second row which is the same as the first, except that the rings are R3-3+3-3, joined at the bottom of each ring to picots 1, 3, and 5 of each chain instead of to the previous ring.   (So the 3 rings on the second row for every ring on the first row.)

I’m doing a masters degree in accounting and I worked on this project a lot while in class.  It was just the perfect project for class in that it kept my hands busy and gave me something to do, but was simple enough that it didn’t actually take any concentration.  PLUS because the final piece was going to be so ruffled, it didn’t matter if I made a mistake because you wouldn’t be able to see it.  There’s a few 3+3-3 rings in that second row.

Because it worked so well as a project for class, I’ve been saving it for class and when I had a couple months off from class I forgot about it, even though I’m actually getting close to the end.  Like I said, my original plan for what to do with it had hit a snag so there’s been no push to finish it and I didn’t really notice that I had stopped working on it.

The original plan was to use it on this hat frame:
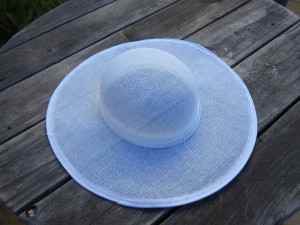
I picked up the frame at the awesome millinery store in downtown LA.  I have dreams of one day figuring out a way to cover it with a cool single layer/flat piece of tatting, but right now the various curves of the hat have me thinking that kind of a project would take a LOT more time to design than I want to put in right now.  So I thought a cool ruffled edging around the whole thing would be good enough for my “first” hat.

Until I was about half way through the tatting it never occurred to me that this is a hat FRAME and I’d have to figure out some way to cover it.  Um… Yeah…

For those who don’t know me, I am not a sewer.  I think it’d be cool to know how to sew things and cover hats, but I’m just not willing to put in the time it would take to learn to sew.  I just don’t think I would enjoy it as much as I enjoy other things that I’d rather spend my time on.  (Like tatting.)

So about half way through an extremely large piece of lace I realized that when I finished it I’d probably just put it next to the hat frame and forget about it for a few years.  Not a big loss, because it IS the perfect project to work on in class so if nothing else it’s helped me concentrate during lecture.  (My mind focuses much better if my hands have something to do.)  So I kept working on it, settling on the idea that maybe I’d end up using it as an edging for a dress or skirt or something.  I don’t have a skirt or dress that it would work with, but maybe by the time I finished it I would…

Anyway.  I’ve had a couple months off from classes so I set it aside and forgot about it until I stumbled on it a week or two ago.  I probably only had another shuttle-full left on it so I started it up again in the interest of actually finishing some of my big projects.  I figured I’d finish up the tatting so that I’d be ready to sew it on when I found the right dress/skirt.  Then just yesterday mom gave me this:
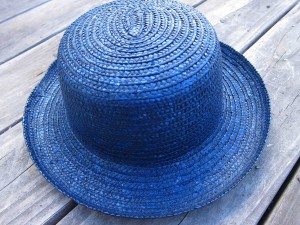
Not quite the wide brimmed sun hat I had originally envisioned, but the colors match and it’s already covered.

Looks pretty good, huh?  Only problem is that now I’ve grown sort of attached to the idea of a ruffled edging along the bottom of a dress or skirt.  Guess that as soon as I finish this one I’d better get started on another…


Comments (3)

Third Panel Finished!

And we’re back!  Just finished up another pledge drive at work which has kept me super busy for the last two months.  (Taking classes for my masters at the same time hasn’t helped much.) Glad to be back on a more “normal” work schedule and (as a added bonus for my tatting deprived little fingers) I happen to have August and September off from classes so hopefully either lots more time more tatting and working on the Priscilla Project or lots more time for getting caught up with the rest of my life.  Hopefully both, but we’ll see.

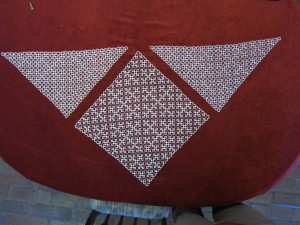
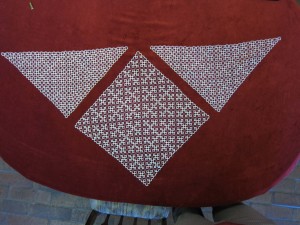
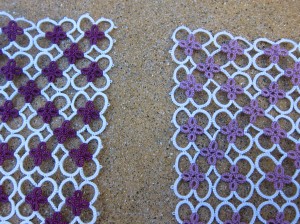
For this first post back, I wanted to celebrate the fact that I just finished the 3rd (and last) panel for my shawl.  Don’t they look pretty?  The colors are a little off because of the red tablecloth, but you get the idea.

The next steps are to tat edgings that will attach the pieces together and then to create a a border around the whole things. Both these parts will be done in white so I’m done with the color work for the piece.  I’m hoping that a white connecting piece and a white border around the whole thing will pull it all together and create an even stronger stain glass effect.  Both the connecting piece and the border will be done with one of the edging variations (or maybe two different ones) for the motif that the whole thing is based on, but I haven’t figured out yet how do the corners on the border or how to do the parts of the border at the point that it meets the ends of the connectors on the edge.  So for the moment I’m setting aside these three panels and will be playing around with a couple samples.

Actually, now that I write that it occurs to me that maybe I can figure it out on the computer.  See, I’ll be using all sorts of variations on the motif that I wrote up my Variations on a Theme booklet about so I have all the pieces of the motif saved in my graphics program and maybe I can figure out something that works there.  Would certainly be faster than thread and shuttles.  Because the edgings are made with the same stitch count as the motifs I know they will match together easily.  I’ve never tried to turn corners before with this pattern so that’s going to be the tricky part.

Been working on a couple other things from the Priscilla books too, so I’ll try to write about those soon as well.

Comments (7)

The Shawl – Half(?) Done

I started this shawl approximately 2 years ago and I think now I’m about half done.  It’s been two years since I started, but I have a tendency to just do a shuttle-full worth of work on it at a time before I put it away for a month or so and then do a bit more work on it.  I’m estimating that there’s probably only about 50 hours of actual work in it so far.

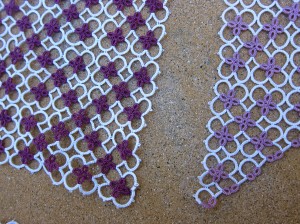
The plan is for it to be triangle shaped.  These three pieces and then a white border around it.  I’ve just started the second light purple and white triangle and this one will match the first one on the other side.  Originally I had planned to have these three pieces right up next to each other, but when I tried to do that I found that the edgings where they joined the colors were just too busy.

I stared at it for a while and decided finally that I just needed some sort of buffer in white between the two pieces.  So now the plan is to have a white insertion between the two pieces to keep the colors separate.  With the matching white border around the entire piece I’m hoping this will come out looking really nice. The pattern always reminds me of stain glass and I think having these sections of white will increase that effect.

I’m a little concerned about how I’m going to make the parts where the edging meets up with the insertion and concerned about how I’m going to make the edging turn the corners around the triangles, but I’ve decided to wait and just figure that out when I get to it.  I figure I’m actually over half done with the tatting of the finished piece now, but once you take into account all the retro-tatting and experimenting I’m going to end up doing to turn those corners I think I’m less than half done with the project.

Doing the three main sections separately and joining them with an insertion has the added advantage of meaning that I can work on them separately and don’t need to carry around the whole thing while I’m working on it (or at least not until the end.)  As much as I love the idea of really big pieces being done all in one go (no ends to cut and tie except when adding new thread) it is nice to be able to just focus on one smaller piece (where smaller is still about 20 hours worth of tatting…)


Comments (4)